Páginas

sexta-feira, 27 de dezembro de 2013

Hits Speciallità Atena

Oi, gente! Não sei se vocês pensam como eu, mas para mim parece que os dias entre o Natal e o Ano Novo são um período de espera. O Natal já passou, ainda estamos no clima do feriado e logo depois vem o Ano Novo. Por esse motivo, hoje não estava afim de fazer nenhuma nail art, só queria usar um esmalte bonito. Escolhi o Atena da Hits Speciallità, porque ele é lindo e hoje o Sol resolveu aparecer aqui no Espírito Santo.
Hi, guys ! Don't know if you think like me, but it seems to me that the days between Christmas and New Year are a waiting period. Christmas has passed, we're still in the holiday mood and  New Year is coming. For this reason, today I wasn't in the mood to make any nail art, just wanted a nice polish. I chose Hits Speciallità Atena because it is beautiful and today the sun decided to show up here in Espírito Santo.

Luz solar direta. | Direct sunlight.
Desde que comprei o Atena, ele era sempre uma das minhas opções de esmaltação. Quando vou pintar as unhas, separo alguns esmaltes que estou com vontade de usar e depois vou eliminando até chegar no(s) escolhido(s). Bom, o Atenas estava sempre ali, mas algo sempre me impedia de usá-lo.
Since I bought the Athena, it was always one of my options for painting my nails. When I paint my nails, I separate some polishes that I'm willing to use, and then I'll get up in eliminating until I have the chosen polish. Well, Atena was always there, but something always kept me from using it .

Luz solar direta. | Direct sunlight.
Esse Atena é da coleção Hits no Olimpo mais nova. Não tenho o Atena antigo para comparar, aliás esse é o único esmalte da coleção que comprei (e um dos poucos Hits que tenho), mas, pelas comparações que vi rolando nas internetz, a nova versão ficou mais bonita que a anterior.
This Atena is from the newer Hits no Olimpo collection. I don't own the old Atena to compare, indeed this is the only nail polish from this collection I bought (and one of few Hits polishes I have), but from the comparisons I've seen rolling in the internet, the new version is more beautiful than the last one.

Luz solar direta. | Direct sunlight.
Nas fotos, usei apenas duas camadas do Atena, sem top coat.
In the photos, I spent only two layers of Athena, no top coat .

Luz solar direta. | Direct sunlight.
Flash.
Flash.
Luz artificial direta. | Direct artificial light.

O Atena ganhou um lugar especial no meu coração. E no de vocês?
Atena guaranteed a special place in my heart. What a about yours?

Beijos!
XOXO

terça-feira, 24 de dezembro de 2013

Feliz Natal! | Merry Christmas!

Oi, queridas! Como estão? Primeiramente, gostaria de desejar a todas vocês um Feliz Natal, muitas felicidades e saúde!
Hi, dears! How are you? First I want to wish you all a Merry Christmas, lots of happiness and health!

As cores do Natal são verde e vermelho. Geralmente, usamos dourado e prateado também na ocasião. A opção mais óbvia é fazer as unhas com essas cores.  Mas eu estava rebelde e queria fugir do óbvio. Não deu certo. Então, o que temos para esse Natal é verde e vermelho mesmo.
The colors of Christmas are green and red. Generally, we also use gold and silver on occasion. The most obvious option is to do your nails with these colors. But I was rebellious and wanted to escape the obvious. It did not work. So what we have for this Christmas is still green and red.


Os esmaltes usados foram o Azizah da La Femme (dedão), o Karina da Shimmer Polish (indicador), o Bianco Puríssimo da Risqué (médio e anelar) e o Gita da La Femme (mindinho). Fiz as estampas de suéter com um pincel fino e tinta acrílica verde e vermelha. 
The polishes I used were La Femme Azizah (thumb), Shimmer Polish Karina (index), Risqué Bianco Puríssimo (middle and ring fingers) and La Femme Gita (pinky). Made the sweater pattern with a thin brush and green and red acrylic paint.


Feliz Natal!
Merry Christmas!


domingo, 22 de dezembro de 2013

Christmas Pastel Skittles

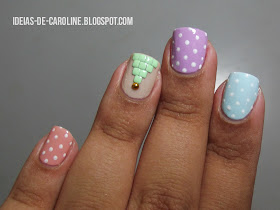
Oi, meninas! Ontem estava super em dúvida sobre qual cor ia pintar as unhas. Separei várias combinações possíveis, mas os tons pasteis acabaram vencendo porque eles tem um lugar especial no meu ♥. Como faltam pouquíssimos dias pro Natal, optei por dar um ar mais natalino a minha mani.
Hi, girls! Yesterday was really in doubt of what color I would paint my nails. Separated several possible combinations, but the pastel shades ended up winning because they have a special place in my ♥. As Christmas is only a few days away, I opted to give a more Christmassy look to my mani.


As cores usadas são Banana da Colorama, Oceano da Ellen Gold (tô apaixonada por esse azul bebê, gente), Lilás da Passe Nati, Manjar de Tapioca e Toque de Penélope, ambos da Risqué. Fiz o poá com esmalte branco e uma dotting tool. A árvore foi feita com tachinhas quadradas verdes e uma circular dourada. Por último, passei uma camada de top coat da Ellen Gold.
The colors used are Colorama Banana, Ellen Gold Oceano (I'm in love with this baby blue people), Passe Nati Lilás, Manjar de Tapioca and Toque de Penélope, both from Risqué. Did polka dots with white polish and a dotting tool. The tree was made with green square studs and a gold round stud. Finally, I spent a layer of top coat of Ellen Gold.


O Natal praticamente chegou e ainda faltam milhares de coisas para eu fazer... mas pelo menos a nail art já está (mais ou menos) definida. Mas, e vocês, como estão os preparativos pro Natal? E a manicure, já está decidida? 
Christmas almost arrived and there are still thousands of things for me to do ... but at least the nail art is now (more or less) set. But what about you, how are the preparations for Christmas? And the manicure is already decided?

Ah, já ia me esquecendo. O desafio da Nail Polish Canada acabou (fiquei em terceiro na última semana) e fica registrado aqui o meu MUITO OBRIGADA a todos que votaram em mim, amigos, leitoras... Durante as três semanas, fiquei entre as três mais votadas. Infelizmente, não ganhei em nenhuma das semanas, nem fui escolhida como finalista. Me esforcei muito e fico triste por não ter ganhado, mas muito mais desafios virão em 2014!
Oh, I almost forgot. The Nail Polish Canada challenge ended (came in third in the last week) and is registered here my THANK YOU to everyone who voted for me, friends, readers ... During the three weeks, I was among the three most voted. Unfortunately, I wasn't the winner in any of the weeks or chosen as a finalist. I I strained a lot and I'm sad, but more challenges will come in 2014!

Beijos!
xo

quarta-feira, 18 de dezembro de 2013

Shimmer Polish Caroline

Oi, gente! Hoje vou mostrar um esmalte muito especial para vocês: o Caroline da Shimmer Polish. Ele é especial porque 1) tem o meu nome e 2) ele é MUITO lindo. Quando o vi na loja da Shimmer, o que me chamou atenção foi o nome. Eu achei tão legal! Depois vi mais fotos dele e me apaixonei. Na época, comprei o Caroline e o Karina
Hi, guys! Today I will show a very special polish for you: Shimmer Polish Caroline. It's special because 1) it has my name and 2) it's VERY beautiful. When I saw it in the Shimmer store, what caught my attention was the name. I thought it was so cool! Then I saw more pictures of it and fell in love. At the time, bought the Caroline and Karina.


Demorei para usá-lo porque estava procurando uma cor base para ele. Acabei escolhendo o Obesessão da Risqué.
I delayed to use it because I was looking for a base color for it. I ended up choosing Risqué Obesessão.

O Caroline tem tipo uns 979123091 glitters diferentes, mas eu consegui identificar: hexagonais roxo, quadrados lilás, magenta, holográfico prata e translúcido azul/verde.
Caroline has something like 979123091 different glitters, but I could identify: hexagonal purple, square lilac, magenta, holographic silver and blue/green translucent.


Queria fotografar essa belezinha no sol, mas está chovendo muito mesmo há dias aqui no Espírito Santo, então vou ficar devendo essa.
I wanted to photograph this baby in the sun, but it is raining heavily for days  here in Espírito Santo, so I'm gonna owe you this.


segunda-feira, 16 de dezembro de 2013

Silver Dots

Ei, pessoal! Hoje vim mostrar um mani que eu fiz há um tempinho, mas não postei por causa do desafio da Nail Polish Canada
Hey, guys! Today I came to show you a mani I did a while ago bu didn't post because of the Nail Polish Canada Challenge.

Luz artificial direta. | Direct artificial light.
Passei duas camadas do Deep Blue da B.U e fiz as bolinhas com o Brinco de Festa da Colorama e uma dotting tool. No anelar, passei duas camadas do Brinco de Festa e mais duas camadas do Disco Ball da Impala. No final, passei uma camada do top coat da Ellen Gold.
I spent two layers of B.U Deep Blue and made the dots with Colorama Brinco de Festa and a dotting tool. On my ring finger, spent two layers Brinco de Festa and two layers of Impala Disco Ball. In the end, I spent a layer of Ellen Gold's top coat.

Luz artificial direta. | Direct artificial light.

Luz do sol direta. | Direct sunlight.

Luz do sol direta. | Direct sunlight.

Luz artificial direta. | Direct artificial light.

quinta-feira, 28 de novembro de 2013

Classic

Ei, pessoal. A manicure de hoje ficou bem simples, tanto que eu nem ia colocar aqui no blog. Mas não é só de tribais que vive esta blogueira que vos escreve fala, então resolvi compartilhar com vocês este esmalte que estará no meu  pra sempre.
Hey, guys. Today's manicure iss pretty simple, I wouldn't even put it here on the blog. But not only of the tribal prints lives this blogger that writes speaks to you, so I decided to share with you this polish that will be in my ♥ forever. 


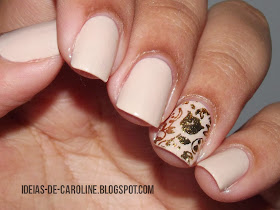
Esse nude maravilhoso é o Manjar de Tapioca da Risqué (ô nome mais infeliz). Ele tem uns glass flecked lindo que faz toda diferença. Pensei que ele fosse ser muito ralo e uma tristeza pra passar, mas a Risqué sambou na minha cara e essa belezinha fica assim com duas camadas.
This wonderful nude is Risqué Manjar de Tapioca. It has a beautiful glass flecked that makes all the difference. I thought it would be too thin and really hard to apply, but Risqué surprised me and this baby looks like this with just two layers.


Por fim, coloquei essa película dourada da Fino Traço. Foi a primeira vez que usei uma película e amei! A aplicação não poderia ter sido mais fácil e o resultado final ficou demais! Ficou chique demais, gente, bem clássico.
Finally, put this nail film by Fino Traço. It was the first time I used a nail film and I loved! The application could not have been easier and the end result was awesome! It was too fancy, folks, very classic.


segunda-feira, 18 de novembro de 2013

Born Pretty Store Review: 2mm Fluorescent Studs

Oi, pessoal! Estou de volta com outra review, mas dessa vez o produto vem da loja Born Pretty Store. A querida Daisy me mandou essas lindas tachinhas florescentes em tons pasteis. Ainda bem que alguém inventou isso, porque se tachas e tons pasteis são lindos separados, ficam maravilhosos juntos num mesmo produto.
Hi, guys! Today I'm back with another review but this time the product is from Born Pretty Store. The lovely Daisy sent me these gorgeous 2mm Fluorescent Studs in pastels tones. I'm glad someone created these because studs and pastels rock, together they're even better! 


As tachinhas vem em 6 tons diferentes: lilás, rosa (tipo Barbie), pêssego, azul bebê, um verde com um tico de azul e verde limão. Tem tachinhas quadradas e circulares, de 2mm de tamanho, para cada tom.
The studs come in 6 different tones: lilac, Barbie pink, peach, baby blue, a bluish green and lime green. There's 2mm square and round studs for each tone. 


Essa é a nail art que eu criei para usar as tachinhas. Nas unhas dos dedos médio e anular, fiz uma estampa chamada houndstooth, usando esmalte preto, o Grande Atração da Colorama (coral), o Orah da La Femme (pink) e o Lilás da Passe Nati. Nas outras unhas, coloquei tachinhas rosa, pêssego e lilás.
This is the nail art I created with the studs. On my index and middle fingers nails, I made a houndstooth pattern using black polish, Colorama Grande Atração (coral), La Femme Orah (pink) and Passe Nati Lilás.


Neste calor que está fazendo no Brasil, não há manicure que resista. Apareceram um monte de bolhinhas. :(
Sadly, a lot of bubbles showed up. :(


Essas tachinhas coloridas são vendidas na Born Pretty Store por USD$7,59. Há mais opções de cores e formatos disponíveis no site. E, se você gostou dessas tachinhas ou qualquer outro produto da loja, você pode usar o meu código RZL91 para ganhar 10% de desconto no valor total da sua compra.
The 2mm flourescent studs are sold at Born Pretty Store for USD $ 7,59. There are more color and shape options available on the site. And if you liked these nail art decorations or any other product in the store, you can use my code RZL91 to win 10% off the total price of your purchase.


Esse produto foi enviado para mim, pela loja Born Pretty Store, para teste.
This product was sent to me by Born Pretty Store for reviewing purposes.

sábado, 9 de novembro de 2013

The Stamping Saga - Pt. 1

Em dezembro do ano passado, me dei de presente de Natal um kit pra carimbo. Comprei a placa m57-1 da Konad, o carimbo, a espátula e um esmalte preto pra carimbo. Até hoje, só carimbei minhas unhas três vezes (não tirei foto de uma delas e a outra você pode ver aqui), contando com a tentativa que vou mostrar no post de hoje.
In last December, I gave myself for Christmas a stamping kit. I bought the plate m57-1 from Konad, the stamp, the scraper and a black stamping nail polish. Until today, only stamped my nails three times (didn't take pictures one of them and the another one you can see here), with the attempt that I'll show in the post today.


Bem pouco, né? Pra falar a verdade, sempre achei carimbar meio difícil, apesar de ser bem prático. Mas a prática leva à perfeição, então comecei a minha jornada rumo a carimbada perfeita e rápida. Tem início, neste digníssimo post, Carimbo: A Saga - Parte 1 (The Stamping Saga - Pt. 1), estrelando Robert Pattinson eu mesma.
Very little, right? To tell the truth, I always thought stamping kinda hard, despite being very practical. But practice brings to perfection, so I started my journey to perfect and quick stamp. Begins at this unique post, The Stamping Saga - Pt 1, starring Robert Pattinson myself.


Foi meio sem querer que esse post começou. Não tinha intenção nenhuma de carimbar as unhas, só sabia que queria usar o Noite Africana da Colorama e que tinha que ter alguma coisa pra enfeitar. Depois que as duas camadas do Noite Africana estavam secas, fiquei pensando o que que eu podia fazer. Então vi o Techno da Ana Hickmann dando sopa na minha caixa e pensei "venha, que eu vou lhe usar!". Usei a estampa de telinha da m57. Ficou bem sutil e de longe mal dá pra ver. Mas quando você olha de perto, principalmente no sol, fica lindo demais.
I had no intention of stamping my nails at all just knew I wanted to use Colorama Noite Africana and I had to have something to decorate. After the two layers of Noite Africana were dried, I wondered what I could do. Then I saw Ana Hickmann Techno in my box and thought "come on, I'll use you". I used the fishing net image of m57. It was very subtle and by far was barely enough to see. But when you look closely, especially in the sun, it's really lovely.


Ficou faltando um cantinho do dedão porque a minha unha é mais larga do que a imagem da placa, mas nem me importei. Acho que no geral, me saí bem, ficou bem legal. Da próxima vez, acho que vou usar cores mais contrastantes.
My thumb isn't completely stamped because is wider than the image of the plate, but didn't care. I think overall I did well, it was pretty cool. Next time, I think I'll use more contrasting colors.


segunda-feira, 4 de novembro de 2013

Blue. Black. Gold.

A hora da esmaltação está ficando cada vez mais difícil, gente! Tenho um monte de esmaltes novos prontos para serem usados (culpa do ESmaltes 2013) e não sei qual escolher! Só dez unhas não dão conta não. O jeito é usar vários de uma vez só e fazer um mix 'n match fofo.
Painting my nails is getting increasingly difficult, people! I have a lot of new nail polishes ready to be used (the fault of ESmaltes 2013) and do not know which to choose! The way is to use several in one go and make a cute mix 'n match.


As cores escolhidas como tema foram azul principalmente, dourado e preto. Nas unhas do anelar e do dedão, passei duas camadas do Azul Sensacional da L'Apogée, da coleção Fantastic Glitter's. O Azul Sensacional tem base jelly azul médio com glitters pretos em dois tamanhos: uns bem fininhos e outros hexagonais maiores. No mindinho, passei duas camadas do Chow Chow da Risqué, que é bem parecido com a cor da base do Azul Sensacional, e coloquei glitters hexagonais dourados (tutorial aqui). No dedo médio, passei uma camada do Azizah da La Femme e depois colei os zig-zags de esmalte (Chow Chow). No indicador, o processo foi parecido: fiz um gradiente com o Aquarium da Beauty Color e o Chow Chow e depois colei os zig-zags pretos.
The chosen colors as the theme were mainly blue, gold and black. On the ring finger and thumb nails, I spent two layers of L'Apogée Azul Sensacional, from the Fantastic Glitter's collection. Azu Sensacional is a medium blue jelly based polish with glitters black in two sizes: a really small one and other larger hexagonal. On my pinky, spent two layers of the Risqué Chow Chow, which is very similar to the color of the base of the Azul Sensacional, and attached golden hexagonal glitters (tutorial here). On my middle finger, spent a layer of La Femme Azizah then attached the polish zig-zags (Chow Chow). On my index, the process was similar: I did a gradient with Beauty Color Aquarium and Chow Chow, then attached the black zig-zags. 


Fazer esses zig-zags é muito fácil e exige zero de habilidade manual. Fiz uma montagem bem simples pra mostrar como fiz:
Making these zig-zags is very easy and requires zero manual skills. I made a very simple collage to show how I did:

Você vai precisar de tesoura artesanal de zig-zag, papel encerado ou plástico, esmalte colorido e top coat.
You will need zig-zag craft scissors, waxed paper or plastic, colored polish and top coat.

No papel encerado ou no plástico (o importante aqui é que o esmalte se solte com facilidade da superfície), passe uma ou duas camadas do esmalte colorido escolhido (usei o Chow Chow) formando um retângulo. Em seguida, passe uma camada de top coat pra que o esmalte seque mais rapidamente (essa etapa é dispensável, você pode esperar o esmalte secar naturalmente, só que demora mais). Quando estiver seco, retire a película de esmalte do papel com uma pinça. Corte zig-zags com a tesoura artesanal. Depois de prontos os zig-zags, passe uma camada de top coat na unha e fixe-os. Eles podem ser guardados também pra serem  usados depois.
On waxed paper or plastic (the important thing here is that the polish come loose easily from the surface), spend one or two layers of colored nail polish (I used the Chow Chow) forming a rectangle. Then spend a layer of top coat so the nail polish dries faster (this step is not necessary, you can expect the polish to dry naturally, only it takes longer). When it is dry, remove the film of polish off the paper paper with tweezers. Cut zig-zags with the craft scissors. Once the zig-zags are ready, spend a layer of top coat on the nail and fix them. They can also be stored for later use.

Existem outras formas de fazer essa nail art de zig-zag, só precisa escolher a que é mais prática pra você. Para ver outros tutoriais, clique aqui e aqui.
There are other ways to do this zig-zag nail art, just choose the one that is most convenient for you. To see other tutorials, click here and here.

Conclusão: vocês vão ver muitos outros mix 'n matches aqui no blog.
Conclusion: you'll a lot of mix 'n matches here on the blog.


quarta-feira, 30 de outubro de 2013

Born Pretty Store Review: Mood Nail Polish #7


Oi, meninas! Como eu disse no post anterior, hoje tenho um review pra vocês da Born Pretty Store. A Daisy me enviou esse esmalte que vocês veem nas fotos acima e abaixo, o Yling Mood #7. Esse esmalte muda de cor de acordo com a temperatura. Aqui no Brasil, também é conhecido como esmalte do humor. Quando está frio ou estamos mais relaxadas, esse esmalte fica roxo. Quando está quente ou estamos nervosas ou irritadas, ele fica azul céu. A mudança entre as cores não é drástica, pode-se observar tons de azul arroxeado (ou roxo azulado haha).
Hi, girls! Like I said in the previous post, I have a Born Pretty Store review for you today. The dear Daisy sent me this polish that you see in the pictures above and below, the Yling Mood #7. This polish changes color according to the temperature. It's also known as mood polish. When it's cold and we're more relaxed, this polish is purple. When it's hot or we're nervous or angry, it is blue. The change between colors is not drastic, you can observe shades of purplish blue (or bluish purple lol).


O esmalte tem uma embalagem bonita. A tampa prateada tem o mesmo diâmetro do vidro e pode ser retirada deixando uma tampa preta menor e mais prática #chanelfeelings. Assim que recebi o esmalte, tomei um susto. Pensei: esse troço não tá misturado direito. E realmente no vidrinho o esmalte não fica uniforme. Tentei chacoalhar de tudo que é jeito e ele continua como na foto. Eu não me importo contanto que fique bonito nas unhas. E fica, meninas, ele fica bem uniforme.
The polish has a beautiful packaging. The silvered cover has the same diameter as the bottler and can be removed leaving a smaller and more practical black cover. So I got the polish, I got scared. I thought this stuff is not mixed right. And on the bottle, the polish is not uniform actually. I tried to shake all that way and he is still as pictured. I do not care as long as it looks good on the nails. And it does, girls, it looks even.


Passei duas camadas para um boa cobertura. Percebi que ele demora mais tempo para secar do que os esmaltes normais. E ele também é a base de água: ele se dissolve na água se não estiver completamente seco. Por isso, aconselho passar pelo menos uma camada de top coat. O cheiro dele também é diferente, parece perfumado, mas é bom e não é muito forte.
I spent two coats for good coverage. I noticed that it takes longer to dry than normal polishes. And it is also water-based: it dissolves in water if it's not completely dry. Therefore, I advise spending at least one layer of top coat. His scent is also different, it seems fragrant, but it is good and not very strong.


O que eu achei o mais legal desse esmalte é o contraste das cores. Já tinha visto esmaltes do humor que apenas escureciam ou ficavam mais claros com a mudança de temperatura, passavam de uma rosa mais claro para um mais escuro. Mas os esmaltes dessa marca mudam de cor mesmo, não só de tom. No post anterior, o usei como o recheio do cupcake. Mas podemos inventar mil e umas nail arts, fica muito divertido.


What I found coolest about this product is the contrast of colors. Had seen mood polishes that only darkened or became more clear with the temperature change; passed from a lighter pink to a darker one. In the previous post, I used it as the filling of the cupcake. But we can invent a thousand and one nail arts, gets really fun.


O Yling Mood #7 é vendido na Born Pretty Store por USD$7.84. Eu escolhi a cor #7, mas há mais umas nove cores lindas disponíveis no site. E, se você gostou desses esmaltes ou qualquer outro produto da loja (tem muuuuuita coisa lá), você pode usar o meu código RZL91 para ganhar 10% de desconto no valor total da sua compra.
The Yling Mood # 7 is sold at Born Pretty Store for USD $ 7.84. I chose the color # 7, but there are few more beautiful colors available on the site. And if you liked these nail polishes or any other product in the store (there's a lot there), you can use my code RZL91 to win 10% off the total price of your purchase.


sexta-feira, 25 de outubro de 2013

So Sweet!

Oi, gente! Hoje eu estou uma doce de pessoa, literalmente haha. Já tem um tempo que eu estou pensando em fazer uma nail art com cupcakes e afins. Semana passada, recebi um "esmalte do humor" (mood polish) da Born Pretty e achei que ficaria super legal em uma nail art.
Hi, folks! Today I'm a very sweet, literally haha. I've had an image of a cupcake and candies nail art in my head for a long time. Last week, I received a pack from Born Pretty and inside of it there was a beautiful mood polish. I thought a nail art with this polish will be awesome.  


Comecei com duas camadas do Corda Bamba da Colorama. Depois fiz o cupcake na unha do dedo médio usando o mood polish #7, o Sapo Encantado do Avon e tintas acrílicas branca e preta. Nas demais unhas, fiz algo que me lembra um sorvete, mas não tenho um nome apropriado (aceito sugestões!). Elas foram inspiradas por esse tutorial da Alice do blog One Nail to Rule Them All e ela as chama de drip nails. Para essa unhas, além do Corda Bamba, usei o Lilás da Passe Nati, Aquarium da Beauty Color e tintas acrílicas branca e preta também.
I started with two coats of Colorama Corda Bamba. Then I made the cupcake design on my middle finger nail using the mood polish #7, Avon Sapo Encantado and black and white acrylic paints. On the another nails, I tried to recreate Alice's drip nails. She owns the amazing nail blog One Nail to Rule Them All. She made a tutorial for these nails, make sure to click here and check it out. On my drip nails I used Passe Nati Lilás, Beauty Color Aquarium and black and white acrylic paints.

Como falei usei um mood polish, que é nada mais do que um esmalte termo ativado. Escolhi a cor #7 que transita do azul claro (quente) ao roxo (frio). Nas fotos abaixo, dá pra ver as duas cores. 
The mood polish is nothing more than a temperature-activated polish. I picked color #7 (they don't have names, only numbers :/) which changes from light blue (hot) to purple (cold) and vice and verse. You can see the to shades on the pics below.


O próximo post vai ser uma review para o mood polish e nele vou falar a minha opinião sobre o produto, então fiquem ligados!
The next post will be a review for this mood polish and I'll tell all I think of it, so stay tuned!